As Apple's ecosystem allows seamless integration between devices like your iPhone and Mac, it's very convenient to have iPhone contacts synced on Mac. You can receive and make a FaceTime call to your iPhone contacts on Mac easily, view and send text messages of your iPhone contacts on Mac seamlessly, and share iPhone contacts with other people quickly.
So, are you wondering about the details of how to sync contacts from iPhone to Mac? You are at the right place! In this article, we will show you 5 quick ways to sync iPhone contacts to Mac with ease. If you're having trouble, we will also introduce why your iPhone contacts not syncing to Mac. Keep reading!
Method 1: Sync Contacts from iPhone to Mac with iOS Transfer Tool
The most recommended way to sync iPhone contacts to Mac is to use a professional iOS Transfer tool. FonePaw iOS Transfer is such a tool, which works perfectly to sync multiple or all your iPhone contacts to Mac easily and quickly.
It offers a straightforward method to export iPhone contacts to CSV/VCF, and then transfer contacts from your iPhone to Mac, especially when you fail to use iCloud due to iCloud syncing problems or lack of storage space, since iCloud only provides 5GB free space for you.
- Transfer contacts from iPhone to Mac without iCloud/iTunes
- Transfer multiple or all contacts according to your selection
- Export contacts from iPhone to Mac and view them anytime
- Edit, delete, and add contacts to iPhone from your Mac and Windows PC easily
- Sync a variety of data types, including contacts, photos, videos, messages, and more
How to Sync Contacts from iPhone to Mac with iOS Transfer Tool:
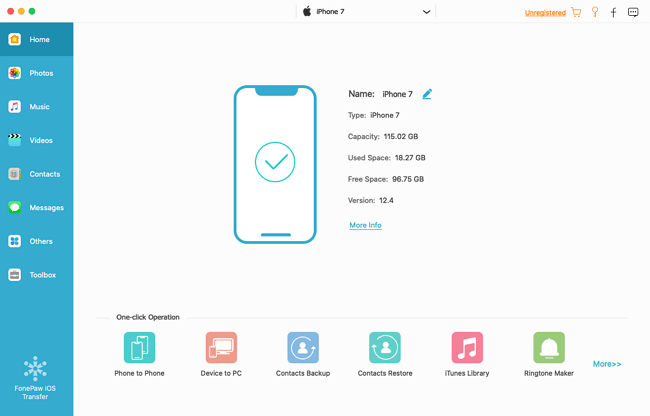
Step 1. Download and install the FonePaw iOS Transfer on your Mac.
Launch it on your Mac after installation, and then use a USB cable to connect your iPhone to your Mac.
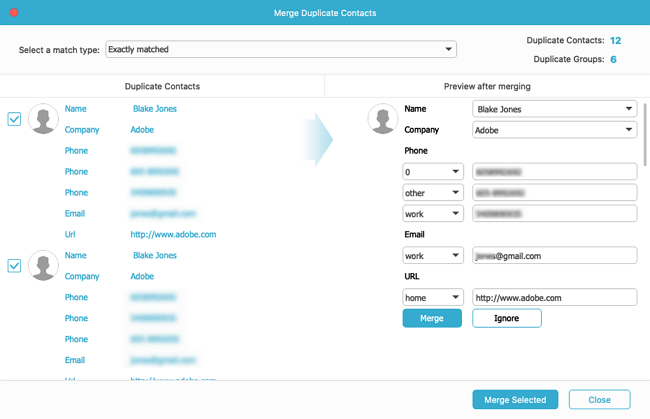
Step 2. In the FonePaw iOS Transfer tool, you should see different categories such as Photos, Music, Videos, and Contacts. Click on the "Contacts" section. You will see a list of contacts on your iPhone. Choose to preview the contact information: name, phone number, address, title, etc. You can also merge duplicate contacts by clicking "De-duplicate".
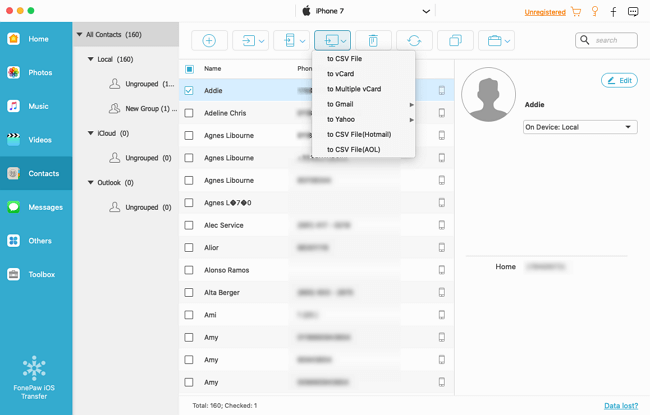
Step 3. Select the contacts that you want to sync to your Mac. You can select individual contacts or choose to select all contacts. After selecting the contacts, export contacts to your Mac. Choose a format for exporting contacts such as CSV or vCard. Select the appropriate format based on your preference or requirements, and then choose a location on your Mac where you want to save the exported contacts.
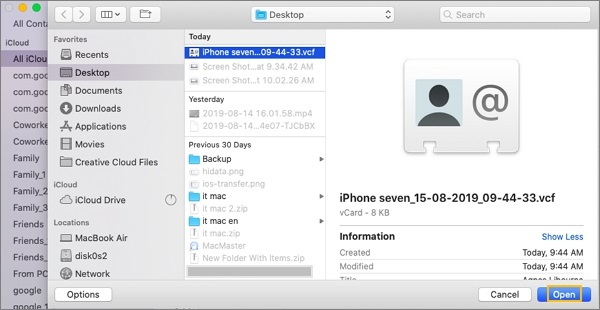
Step 4. Open the "Contacts" app on your Mac, and click "File" in the menu and select "Import". Choose your imported contacts from iPhone, click "Open", then click "Import" to sync iPhone contacts to Mac.
Method 2: Sync Contacts from iPhone to Mac with iCloud
Another way to sync your contacts from iPhone to Mac is to use iCloud. iCloud automatically syncs data across all your Apple devices that are logged in with the same Apple account, which makes it super easy to sync data from iPhone to Mac. The following is how to sync contacts from iPhone to Mac with iCloud:
Step 1. Open the "Settings" app on your iPhone. Navigate to Your Profile > iCloud
Step 2. Turn on the button next to "Contacts".
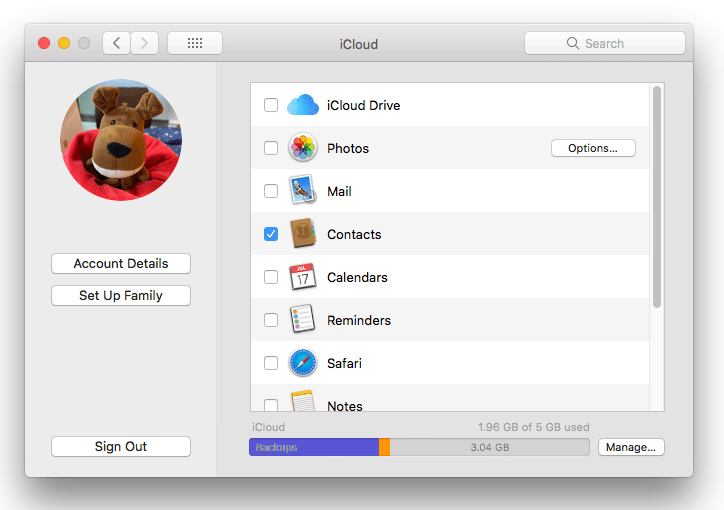
Step 3. On your Mac, navigate to System Preferences > Apple ID/iCloud.
Step 4. Tick "Contacts" in the list of iCloud services.
Please note that iCloud will sync contacts automatically when both devices are connected to the internet. If you want to ensure the latest changes of your iPhone contacts are synced to Mac immediately, you can force a manual sync. Here's how:
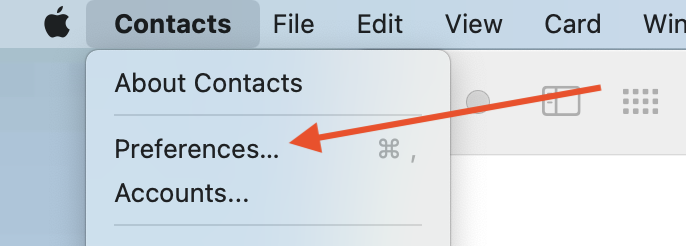
Step 1. Open the "Contacts" app on your Mac.
Step 2. In the menu bar at the top of the screen, click on "Contacts" and then "Preferences".
Step 3. Click on the "Accounts" tab. If your iCloud account is listed, select it and tick "Enable this account".
Step 4. Click on "Card" from the menu bar, and then "Sync" to start manual sync.
Method 3: Sync Contacts from iPhone to Mac with Finder & USB Cable
Fidner is an Apple official tool to transfer files from iPhone to Mac without iTunes, you can use Finder for syncing contacts from iPhone to Mac. The following is how to sync contacts from iPhone to Mac with Finder:
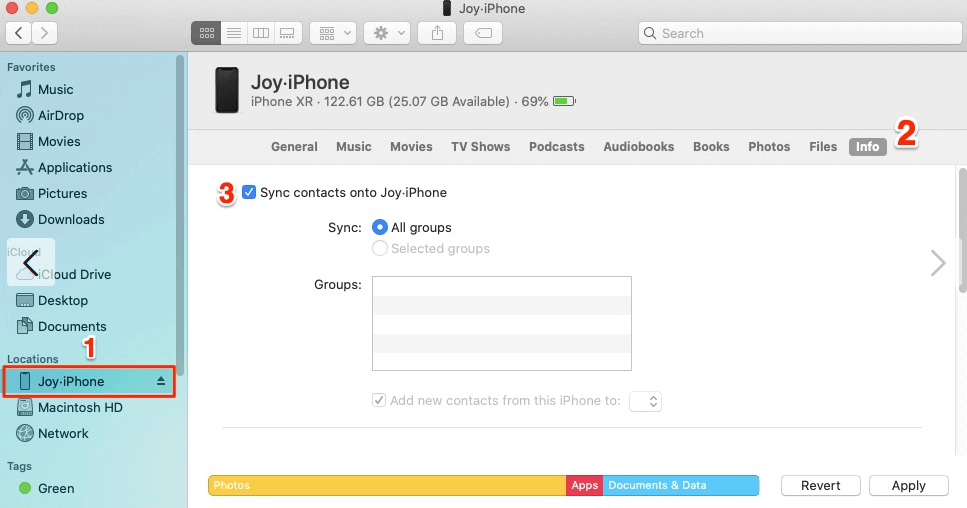
Step 1. Connect your iPhone to your Mac using a USB cable. Open "Finder" on Your Mac.
Step 2. In the sidebar of the "Finder" window, you will see your iPhone listed under "Locations".
Step 3. Click on your iPhone, and then click on the "Info" tab.
Step 4. Under the "Info" tab, tick "Sync contacts onto XXX" to enable contact syncing.
Step 5. You can choose to sync all contacts or selected groups. After that, click on the "Apply" button located at the bottom right corner. It will take a few minutes to sync contacts from iPhone to Mac.
Method 4: Sync Contacts from iPhone to Mac Using Internet Accounts like Google
If you prefer to use your Internet accounts like Google or Microsoft to save your contacts, you can sync the contacts to Mac easily using the "Internet Accounts" feature. As long as your iPhone or Mac is connected to the internet, any changes you make on your Internet Account will automatically sync to the other device. Here is how to sync contacts from iPhone to Mac using Internet Accounts like Google:
Step 1. Navigate to "System Preferences" > "Internet Accounts" > "Google" on your Mac.
Step 2. Enter your Google account and follow the prompts to authorize the account.
Step 3. After adding your Google account, turn on the "Contacts" to sync contacts.
Step 4. Your Google contacts will start syncing with the Contacts app on your Mac.

Method 5: Airdrop Contacts from iPhone to Mac
The last way to access your iPhone contacts on your Mac is to share specific contacts via AirDrop. It works only if you want to transfer just a few contacts. What's more, Airdrop requires both devices to be recent models with Bluetooth and Wi-Fi enabled. Below is how to Airdrop contacts from your iPhone to your Mac:
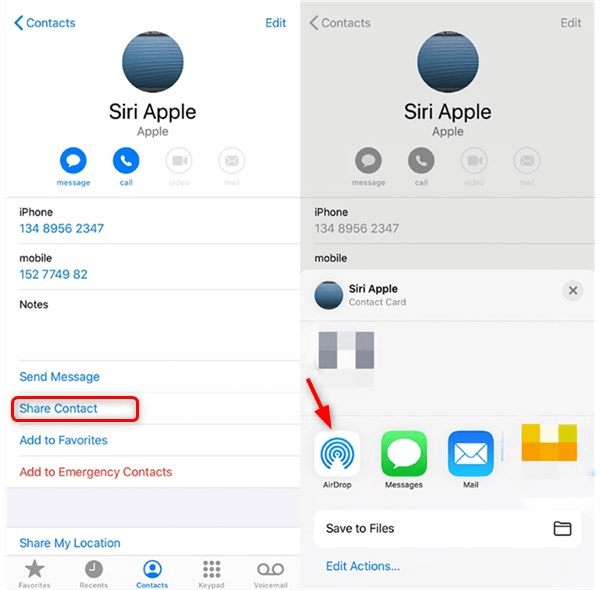
Step 1. Swipe down from the upper right corner of your iPhone to open the Control Center. Enable Bluetooth and Wi-Fi.
Step 2. Launch the "Contacts" app on your iPhone. Find and tap on the contact you want to share. If you want to share multiple contacts, tap "Select" at the top right, then tap the contacts you want to share.
Step 3. Tap Share > AirDrop, and tap on your Mac's icon.
Step 4. On your Mac, you will see an Airdrop notification prompting you to accept the incoming contacts. Click "Accept" to save the contacts to your Mac.
Step 5. After accepting the Airdrop request on your Mac, all the selected contacts will be saved to your Mac's Downloads folder by default. You can then import them into your "Contacts" app.
Troubleshooting of Syncing Contacts from iPhone to Mac
If your iPhone contacts are not syncing between your iPhone and Mac when using iCloud, you can try the following useful tips to solve the "iPhone contacts not syncing" issue:
- Make sure both your iPhone and Mac are connected to the internet.
- Make sure the iCloud Contacts of your iPhone and Mac are both enabled to sync.
- Ensure your iPhone and Mac are running the latest versions of iOS and macOS to avoid compatibility issues.
- Ensure there is enough iCloud storage available for your contacts to sync.
- Try temporarily disabling any third-party apps that manage contacts or VPN or firewall settings that may block iCloud services.
Conclusion
After reading the article, you have learned how to sync contacts from iPhone to Mac. All in all, FonePaw iOS Transfer can be the top iOS transfer software for you, if you want an easy, quick, and seamless way to transfer not only contacts but also other iPhone data from iPhone to Mac.
If you just want to sync your iPhone contacts to your Mac, then you can try other methods like iCloud, Finder, internet accounts, and Airdrop. What's more, if you are encountering the problem of "iPhone contacts not syncing", feel free to try the tips given to solve the problem.
iOS Transfer